
I wanted a little free sewing time to play and create something different. With an already overflowing bin of fabric strips, I had my materials all set. I didn’t want to do the classic string block, so I went digging for ideas. Using Pinterest, I found this photo of a “scrap vortex” quilt from Quiltdivajulie, which became my direction (see photo at the bottom of my post). Julie, wherever you are, this quilt must have been quite the project!! Controlled chaos was just what I needed, but I wasn’t about to cut my strips into tiny pieces as Julie had done. I tend not to like lots of colors all together. It’s a preference that I hope to work on one day, but for now, I went with single-colored blocks to keep the scrappiness a little less wild and crazy.
I divided my multi-colored scraps into separate colors. I gathered fabric strips with the same size in width and attached them together. I made the rows roughly 17-18″ until the block neared a square. With a little starch, I ironed each block being careful to keep the seams flat. Finally, I used my rotary cutter to trim each colored block to 16 inches square. I have made 10 blocks (our of 14) but needed to stop and take a break. I still have purple and pink strings to sew, but they will happen soon.

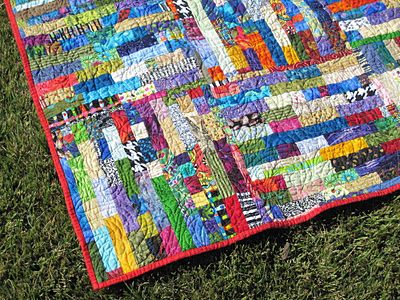
Here are my blocks in progress. Keeping the strips vertical and even is something I’m not great at yet. I trimmed and pressed the red block half-way through sewing and as a result, those bunnies are now marching down a hill. I’m no perfectionist, but I can see that the strips are looking straighter. There’s hope for me yet!


I really really like where this is going!!! Keep it up and keep posting photos!
LikeLike
Thanks. It’s been a fun journey so far. Let’s see what the rest of the week brings. I promise to update my blog.
LikeLike
As always….your eye for color and pattern is awesome.
LikeLike
You are too sweet. I am learning so much from this project. I’m definitely getting better at keeping those rows of strips straighter. It’s all good if I’m learning and using up scraps, right!? You may get a project with this technique one day.
LikeLike
What a wonderful scrappy design! I love the wonky flare.:)
LikeLike
Thank you so much. I can’t wait to complete the top. Stay tuned. I also just looked at your blog with the scrappy string tie quilt for your sister in law. It’s a beauty that I’m sure she will cherish.
LikeLike
I agree with Beth, and it was an advice I had in a class. But wonky strips are beautiful too, and your blocks are lovely!
LikeLike
Thank you for stopping by. I’m going to use that method later today and see how it goes.
LikeLike
These blocks turned out great!
LikeLike
Thank you so much. I’m having fun and using up some wonderful scraps. I can’t wait to play with the layout.
LikeLike
It’s not as easy to sew strings or strip sets together straight as one would think it would be. I have to pay extra close attention when I’m working on projects like that. One thing that helps me is sewing each strip in the opposite direction. So I’ll sew a strip on from top to bottom, and then turn the entire piece and sew the next one on so it’s technically being sewn bottom to top. It helps keep everything straight and avoids the ‘bunnies marching down the hill.’ (Love your description!) I think your string quilt is going to look amazing with all the rainbow colored blocks! I’m looking forward to seeing all your blocks together.
LikeLike
Beth, I had forgotten that trick of sewing in opposite directions!! Thank you so much for the reminder. I will try that on the next blocks that I make. While I love the bunnies, they would be just as cute walking across instead of down. I do appreciate those quilters who can keep things straight. I’m wonky in everything that I do!! I truly appreciate you visiting and commenting. I’m now eager to try that other method!!
LikeLike
Beth, yesterday’s blocks were much better. I can’t thank you enough for the reminder of this technique. I’m always in such a rush with my scrappy projects but this time, slow and steady wins!
LikeLike